Showing posts with label equipment. Show all posts

Tuesday, August 13, 2013

Tutorial: $7 Hive Stand


   Finally! The long awaited $7 hive stand tutorial! Sorry it took so long. I know it's been mentioned at least three times before. I've been throwing all of my energy and time into 7 day work weeks (first day off tomorrow in 3 1/2 weeks woo!), with the end goal being the purchase of a nice bee and agriculture friendly parcel of land. It took a while, but things have finally fallen into a rhythm. Now it's time to play catch up with the blog!

   So, for a while I'd been using cinder blocks as a base for my hives. Unfortunately, cinder blocks provide LOTS of surface area for ant activity. Before I knew it, the base of my cinderblocks had become causeways for fire ants. On the positive side, the ants are more interested in dead bees than honey. The ants have been doing an excellent, and very timely, job of keeping the ground free of dead bees. This in turn keeps away more serious pests, and the stray ants do get bullied away from the hive interior by guard bees. It's actually really neat to see! Without physically feeling the wind that comes off of a single bees wings, one would never guess just how powerful they are. If I had three bees on my veil to act as fans at all times, I'd never break a sweat. These girls pack some serious horsepower in those wings! When I was removing the bees from the toolshed, the floor had ended up being covered in sawdust. There'd be the occasional bee lazily flying around the shed about 2 feet off the floor. Those bees would be parting the sawdust in the same way that a boat splits the ocean to create a wake. It's not uncommon to see a guard bee chase an ant to the edge of the entrance, and then turn around to literally blow the ant off the edge with air buffets from it's wings! Crazy girls. They impress me every time I visit the hives.


   That being said, it's a sad fact of beekeeping that it's not uncommon to crunch a bee or three between the outer cover (lid of the hive w/ aluminum covering) and the inner cover or sides of the hive. Ants love to get in there and clean up whoever got crunched. It's a nice service, but I do worry about them overcoming a weak hive, or setting up a nest between the top & inner cover, and going for larvae. So we need something better than cinder blocks. This calls for an actual hive stand with wooden legs!
 
   The nice thing about wooden legs is that it's possible to sit them in cans of motor oil. Motor oil creates an impassible moat that the ants won't be able to cross. Presto! Ant free bee hives! Vegetable oil is no good by the way. It instantly absorbs moisture from the air and will spoil real quick. That in turn will just attract more pests/mold, compounding the problem.


   After a short interwebs search, I came across several really popular designs and YouTube videos for creating ladder-like hive stands. These in turn were set on cinder blocks, which was no good, but the concept was sound! The best part of these hive "ladder" stands is that they're made from $5 2x4's, the most common piece of lumber around. I also found a few designs that had legs, but they were all sorts of overly complicated. In addition, the weight bearing segments had all of the weight resting on the nails... That just didn't make sense to me. Above is one of the popular designs with legs. I'd much prefer having the weight bearing wood, that over 200lbs of hive rests on, be resting on the legs so that the wood of the legs is where the pressure would be concentrated. Is it just me, or does the design above just beg to have the hives come crashing down once the nails rust enough to bend? If those nails come out, then there goes the support for the horizontal beams, and down they go.


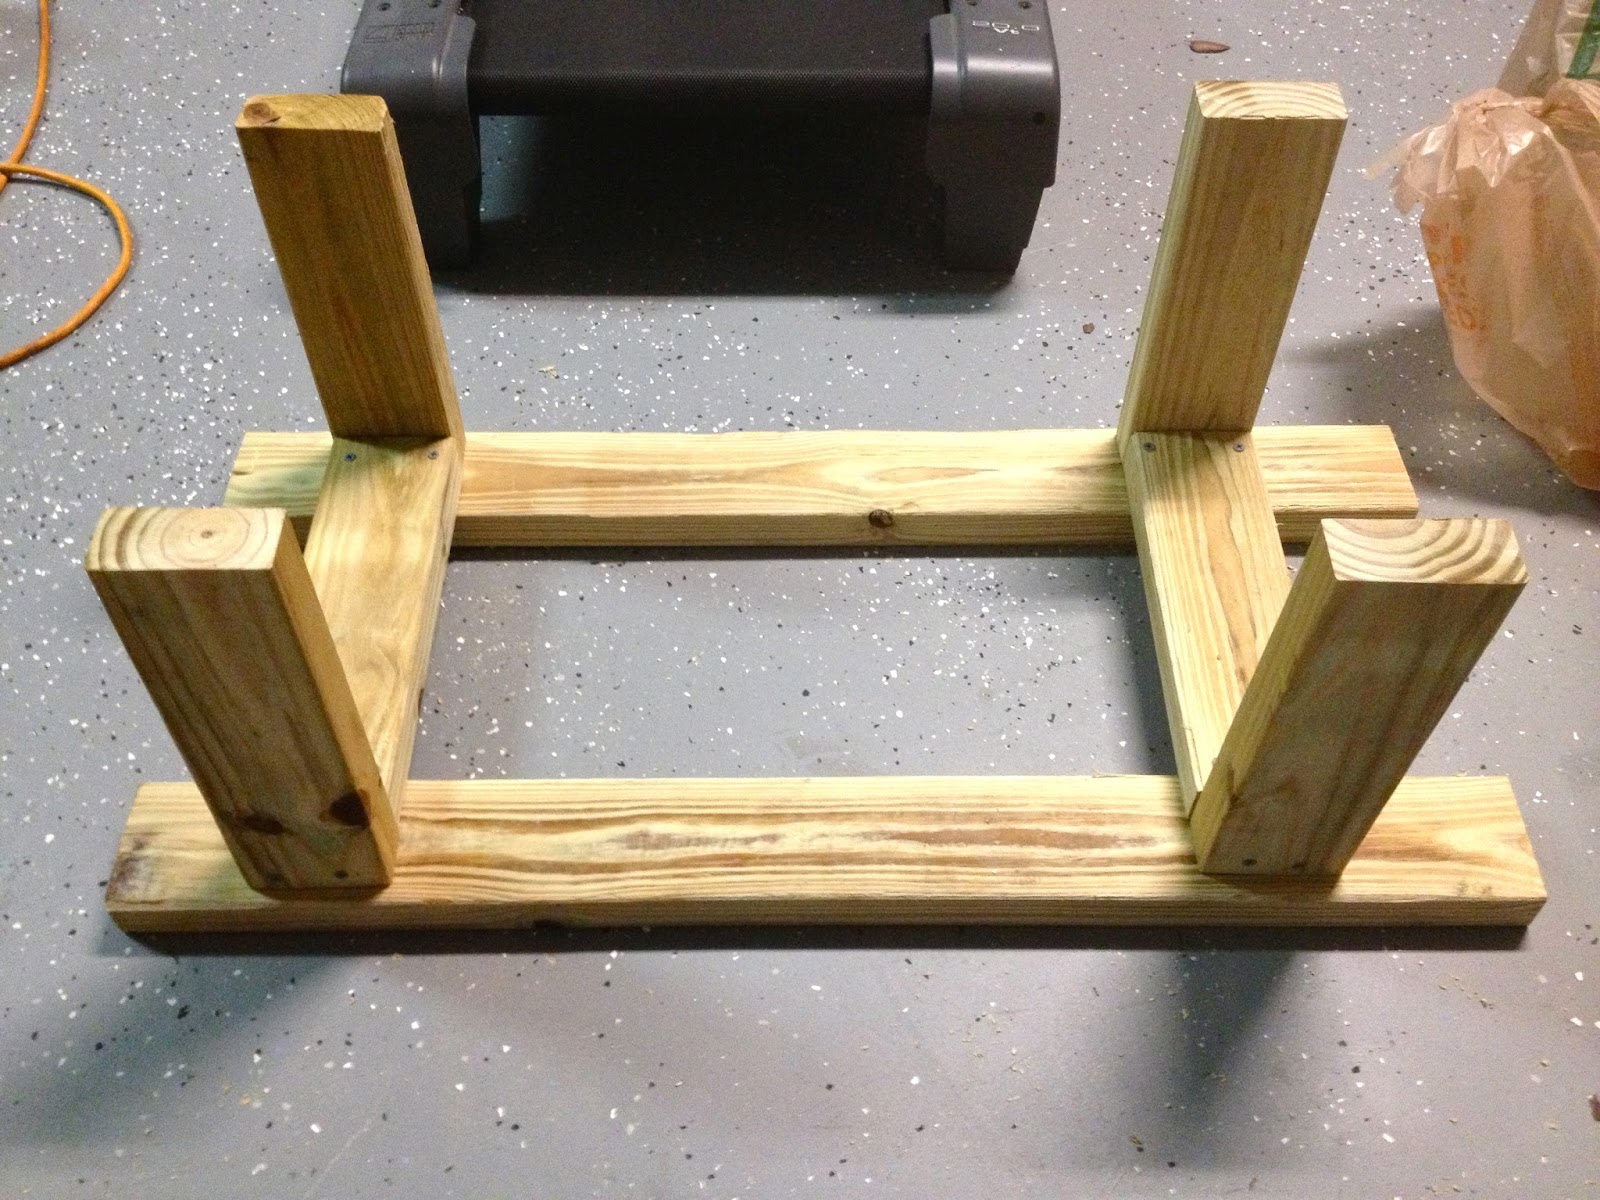
   Here's my design. It's simple, sturdy, and the horizontal beams are situated on TOP of the legs. That way, the weight bears down on the legs, and is distributed by the horizontal beams. That way the nails mainly serve to connect the boards so that there's no movement in the boards. The weight is supported by the density and integrity of the wood, rather than on the integrity of the nails. I'd bet on the nails more quickly rotting through in a 24/7 outdoor environment than this copper weather-treated wood.

   I'm not naive enough to think that no one has come up with this design before, but I wasn't able to find it anywhere else. So I'm going to be willfully ignorant and bask in my own ingenuity for the time it takes to write this tutorial haha.

$7 Hive Stand Tutorial:

Materials For 2 Stands  
3 - 2x4 8" Weather Treated lumber
1 - Saw (I use a Japanese style "ryoba" pull saw)
32 - Weather Treated self-starting 2 1/2" screws
1 - Electric Driver/Drill with a screw-appropriate bit
1 - Measuring Tape
1- Pencil
1 - Pair of gloves (I use soft calf hide. The wood treated lumber is construction grade and will splinter the heck of you real quick, not to mention avoiding the absorption of weathering treatment)
1 - Breathing mask (if sawing in a low-breeze area, you don't want to inhale the moist copper and chemical infused sawdust, seriously.)
1 - Bottom board of a nuc box, if on hand


Step 1) 
Measure out your wood! For two of the 2x4s, you'll want to measure out two 3' pieces and two 1' pieces. The longer pieces will be the horizontal supports, and the smaller will be braces.
The third 2x4 you'll want to cut into four pieces, which are 2' each. These will be the legs.


Step 2)
Use the bottom board of a nuc box to layout the pieces. I didn't see this anywhere, but it just "worked" when I needed something to hold my long boards in place while drilling out these holes. I was a cheapskate and didn't buy self-drilling screws. Learn from my mistakes!


The long support beams fit perfectly on the sides as you can see, and the stabilizing braces also evened out nicely, with the edges approximately centered on the long support beams. You'll just have to eyeball the spacing of the braces from each other. You'll want them about 4" in from the edges. That seems to center the weigh on the legs nicely, while still having the legs close enough to the middle that the support beams won't sag in the middle over time. Also, make sure that the 2' segments settle nicely in next to the support braces, like above.


Step 3)
Screw it all together! Two screws per piece, reference the picture of the finished stand that's flipped upside down. The screws going vertically through support beam <-> braces are wide set, about an inch in from the edges. The screws going horizontal through leg <-> brace are a bit more closely set, that way they run on the inside of the vertical screws.


PRESTO! Your super amazing, ridiculously good looking hive stands are complete! How sweet is that? It took me a longer time since I was kind of generating the plans for this as I went along, but I'm sure it will go much more quickly for anyone following this. It's a lot more simple than other plans, three major steps, and costs $5 per piece of 2x4. That's pretty hard to beat! Store bought stands can run $40 EASY. These can each support two hives with telescoping covers, and can easily be lined up so that the beekeeper can walk down a pathway, with hives on both left and right, with entrances facing away from the keeper.

Not too shabby methinks.


Friday, July 19, 2013

Do You Want Ants? Because That's How You Get Ants


   To preface this post... it's going to be long. Real long! Mainly due to how many pictures there are, and the fact that it took two days to complete (several reasons behind that). I'll save the honey extraction for the next post. Also, this is the first time I've done a REAL cut-out alone. Not a tree pot cut-out, this was a "manually cut through plywood, hammer/claw out nails, and be exhausted at the end" cut-out. Oh, this was also all done in a 15' x 15' shed with no ventilation or airflow, all after rain, and in the 90+ degree Florida heat. Fun stuff!

   This one was actually on the property of one of the guys painting my parent's house. The bees had been in the shed for almost two years, and were very docile, except when the lawn was being mowed. That's pretty normal and they sounded like the average, pleasant feral bees. He asked how much I would charge him, and I threw out a lowball of $50. It sounded like a pretty straight forward job, and the bees definitely sounded like they were strong, durable bees (like most feral bees). So I figured I'd sweat it out, get a nice big, strong hive, and a good amount of honey to make up for the low amount charged for the job. Unfortunately I was wrong, as you'll see later in the post. However, they did have some excellent honey, and a good amount of it. So in the end I still came out with a respectable trade of time/experience/pain for honey/tools/experience.

   Now, normally just to have an exterminator come out would be $300-400 dollars. When an exterminator is called all they do is gas the hive with insecticide, killing off the entire colony, which sucks! Not only is it leaving a vacuum for more aggressive insects (wasps, bees with a higher ratio of africanized genes), but it leaves the home owner with a giant mess of decaying bees, larvae, wax, and honey. Exterminators don't go in, cut out and clean the hive, and relocate the bees so they can help the 5 miles around the hive thrive with plant life. So in the end it's a loss for everyone except the exterminator.


   Oh, the best part of hiring an exterminator to remove the bees is that if YOU don't remove the decaying hive, then ants will do it for you. I don't really think you want ants, do you? A dead hive is a meat and honey buffet for ants, beetles, moths, wasps, raccoons, and a variety of other vermin. So in the end, unless it's an easy to access area, the homeowner will have to cut in and get it all removed anyways. So there'll be repair costs to the property anyways. Better off hiring a beekeeper to remove the bees, cut it all out, and then all the home owner has to do is patch it up. Just make sure they're not wasps before calling a beekeeper to come out... wasps don't make honey.

Day 1


   Anyhoo, on to the cut-out! The homeowner told me that potentially the entire floor was a beehive, considering how long they were there and how many bees they were seeing. It was definitely a possibility, but that'd be a pretty big hive for the pretty average amount of bee traffic I was seeing. 

   
   I did my first cuts using my ryoba saw. It's a Japanese pull saw where the sawing action is done on the "pull" motion. Mainly it uses your back/shoulder/lats. I could saw all day with this thing! Best $25 I ever spent.


   After a few exploratory cuts I dipped my phone in and took a few pics. Yup, definitely bees down there! This cut was 4 feet from the entrance, so far the hive was 4 feet wide. Pretty legit hive! One thing though, there was a pretty high ratio of drones... that could mean a laying worker instead of a queen.

   "Cut through plywood and just lift the whole piece of wood over" was the plan, but I did run into a few road bumps. Namely the NINE BILLION ancient nails buried in the wood. I cut around the perimeter as much as I could, but eventually those nails just had to go. Not only did they line the sides of the plywood sheet where the bees were under, but there was another support plank going through the center of the sheet. The first day I ended up using a flathead screwdriver and hammer to chip away the wood for each nail, then once enough was chipped away it was dug out with the hammer. Eventually I had to go to class though, so I called it after 4 hours. There was no way to do any more than 4 hours in that heat though. It had rained just prior to starting, the early afternoon sun was beating down, and I was wearing a full thickness bee jacket and hood. 

Day 2


   Yup, that's the dimensions of the hive. 4' x 4' doesn't sound like all that much, but just wait until you get to the next picture. Thankfully one of the homeowner's neighbors loaned me his saw. I'd also bought a cat's claw (mini handheld crowbar with pointy V's at each end, designed for digging out nails) for $17, so there went almost half of what I was charging. I'll definitely be charging an appropriate amount for the next job ha.

   It took about an hour and a half of nonstop hammering to get all of the nails out of this board. Meanwhile there were some agitated bees in the air and it wasn't worth missing work again due to another case of "MMA Face". So it was definitely break time, again, before tackling the hive itself. Once the comb is exposed, it's best to just go through it to the end. Stopping only gives time for the queen to get into some impossible corner, brood to overheat/underheat, and the bees to get even more stressed out. So that also means no feasible way of drinking water while in the midst of the bees, plus my gloves were going to be honey soaked. I have a "thing" about sticky hands and grabbing sticky things... I probly shouldn't have picked beekeeping haha.


   I'd brought a gallon of water with me, and 1/2 of it was gone by the time I'd taken this picture. My shirt is all sweat, no water involved there. It's right about here where I reminded myself for the twelfth time to charge a reasonable price.


   Not a bee, but this guy was pretty neat. He just chilled on my elbow for a good five minutes while on my break. I always liked the bugs with metallic sheens. They're like little transformers, and there are a ton of metallic bees too!


   I'm really happy with the picture above and below. Before flipping the plywood sheet I decided to snap a few closeup shots since the bees were so friendly. Throughout the entire cutting and hammering process they'd gone about their business, without so much as a few passes to see what was going on. Somehow these two photos came out perfectly in focus, perfectly lit with natural light, and are great closeups of the bees. 


   Honey bees really are neat little creatures. It's incredible how perfect their form is for what they do.


BEHOLD! See all those leaves? They're from how monstrously fast this board was squatted upwards. Eat your oats.
Just kidding, they're actually stuck to the comb, and I'm way out of shape. This panel weighed about 100lbs before a quarter of the panels fell off due to weight + heat. 


   This picture was taken a bit after the first one. At this point I'd established that there was no queen here. There were thousands of drones, no eggs, no larvae, and the only brood was capped brood and capped drones. The capped brood was very spotty in it's pattern and all of the open cells between capped brood were all filled with honey. This was pretty much the same exact thing I'd seen a few weeks earlier, when helping Mike out with the bees that were under the eaves of the foreclosed home. 

  What this means is that the hive had swarmed, with the old queen leaving with half of the hive. For whatever reason the new queen hadn't survived, and there wasn't any young larvae at that point who could be raised as queens. At that point they were hopelessly queenless.

   Since I don't own a bee vacuum, there would be no taking home of these bees. They were doomed to die out simply from age, and the bees knew it. There was no closed loop of baby bees taking over the duties of the older bees since there was no queen. So their resources were being entirely invested in honey and pollen to raise massive numbers of male drones before all of the female workers died. 

However, their genes would live on through the drones, who would go out and mate with virgin queens. Bittersweet, but that's still chalked up as a success in nature's own brutal way.


   Here's one of the drones from the hive that had decided that he was driving. Pretty cool looking! Very wild feel to his deep orange abdomen with black stripes, and his really neat orange feet! The "aviator" eyes are really clear in this picture as well, and by that I mean eyes that wrap around fully to the back of the head (just like dragonflies).

   I did learn some solid lessons that day as a budding beekeeper. Mainly: charge an honest amount for the effort and knowledge involved, every beekeeper should own a CamelBak, and every beekeeper should own a bee vacuum if they intend on doing cut-outs.

   After getting it all wrapped up I was ready to just fall down face first on my bed. The equipment got cleaned off, put away, and the honey was left for tomorrow. It was such all-in work in such muggy, awful conditions that I had only noticed one sting. The next day, after waking up, I counted out the stings and it was a solid eleven stings. Six in my left hand (one with a stinger still embedded under my skin), one under my left armpit, one on my left ear, and three on my right hand. 

Oh well, the stings are good for the body, and it just makes the honey taste that much sweeter.

Tuesday, May 28, 2013

Hive Inspections Pt.3: Trailer-Home Cut-Out & Winterfell Is Stacked


   This cut-out was actually done the day before the hive checks, and I wanted to cover it before going into the bee yard bees. Mainly because it involves hive beetles, a pest that's very relevant to my bee yard bees.

   Mike contacted me in the morning to see if I could help him out with a cut out involving a trailer home. He had a job to do in the morning, and would be starting the trailer home around the time that Algebra was finishing up. It was also right down the street from my house, so it was a perfect opportunity for more experience. My face was still swollen pretty hardcore, but everything I've read says that heat is a great treatment. So if anything, sweating it out in a bee jacket under the Florida sun would be healthy. 


   Upon arriving at the trailer, Mike joked about how I'd gotten lucky, and that it was only a small hive. Brendhan (owner of Bee Barf Apiaries, the primary removal contracting company) had mentioned to Mike that it'd probly be a good "learning experience" due to just how massive trailer home jobs usually are. Apparently the last one they'd done had been half the length of the ENTIRE TRAILER HOME. What a jokester haha. 

   The bees were quite nice, even with how rough I had to be in order to cut away the insulation they were behind. Now, normally removal is done with a full suit. That way there's a minimum of seams for the bees to crawl into. I don't have a full suit, just a jacket with attached veil, and when things are in turmoil bees naturally want to crawl into small, dark spaces. That includes jean legs. 


   As a matter of fact, one got up my jean legs and climbed as if she was going up Everest. There was no backwards motion at all, even when I blocked her off by closing off her vertical progress by gripping my leg. She was on a treasure hunt for some valuable jewels and there was no way to get her out without the jean material pressing down on her, which would make her sting me anyways. So, unfortunately, I ended up having to slap her, hoping that she'd only get a light sting in. Nope, that stinger got buried to the hilt in my knee. Granted, my face was already swollen up from the previous days sting, but this one ended up not being too bad. I also got stung through one of the seams in my glove's finger joints. However, Neither of them swelled at all, and, again, the stung hand was very free of stiffness. It was nice!


   Here you can see the length of the stinger, it's the red line pointing downwards. Those little swords are retty impressive huh? It must run lengthwise inside for about half the length of their abdomen. I'll have to look up the layout of their internal abdomen anatomy. Stingers are actually two separate serrated-edged "blades" that are positioned side by side with a channel between them. The venom is pumped down that channel and into the wound. Contrary to old wisdom, recent research has shown that it's prudent to just pull out the stinger immediately. Use your fingers or nail to scrape/pinch it out, it makes no difference whether the poison sac gets compressed. It's going to keep pumping, like a little heart, the entire time you scramble around for a credit card to scrape with. The amount is so minuscule that it's going to empty out in the time spent searching.


   Anyhow, back to the cut-out. Overall they were healthy! The laying pattern was nice, and there was a minimum of hive beetles. However, take a look at that picture. I didn't notice it at first, but do you see all those larvae with dark heads? Those are Small Hive Beetle larvae, disgusting little bastards. Due to the insulation being just inches from the hive, and being a nice loosely packed, moisture-holding medium it was perfect for the beetles. These little buggers would pupate into a ton of hive beetles, and those might be enough to start sliming up honeycomb with more larvae. Once the comb is slimed, the bees want nothing to do with it. They'd eventually either move to a larger compartment underneath the trailer, or evacuate completely. So it was a good thing for these bees that we got called in!

   This is another reason to make sure there are oil-filled trays under each hives screened bottom board. That way the bees can toss the beetles to their oily death, and the beetles can't lay their larvae in the ground directly underneath the hive. Beetles can fit through the grating, so without an oil tray it's just one massive entrance.


   The cutting out of the comb only took about 30mins, after that it was a matter of finding the queen. In such a tight space it was pretty impossible to move around enough to check all the bees. Mike made the call to vacuum them up. His vacuum has been modified so that the inside of the vacuum tube is smooth, minimizing injuries from bumping around, and the vacuum itself has a suction control. That way he can set it to the minimum level of suction needed to suck up the bees, also minimizing the friction. Instead of an open chamber and filter, they're suctioned into the above box. We knew we had the queen when the remaining bees started to cluster around the screening. That meant they smelled the queen's pheromones and were trying to stay with her. 

   After that we packed up and Mike took the bees of to their new home in his bee yard. Couldn't have gone any smoother without having secured the queen in a clip!

Winterfell


   Now we move forward again to Thursday, which has been the most exciting "bee day" yet. Winterfell is finally ready for a second hive body! 

   I arrived at the bee yard, cleared out more brush on the way to the hives, and this is the first image I saw. At first it was a bit concerning, since it was actually the day after they were meant to receive their new hive body. They'd been looking a bit crowded the week prior, but I just hadn't been able to take a long enough break from school and work to properly paint a new Deep box with multiple layers of primer.

   Thankfully though, upon giving them a look, it was just normal bearding. As you can see, they have an entrance reducer (wood bar with different opening sizes cut into it) and they simply didn't have enough entrance real estate to spread out along the entire thing. This is just typical "bearding" behavior, where a portion of the bees hang out on the exterior of the box in order to cool off and help maintain internal hive temperature.
   

   I should have taken a picture prior to putting the queen excluder mat on (gridded grey square) the top of the hive. The whole top surface of the bars was covered in bees! It was awesome! These girls are busy, and definitely need this new hive body! Now, they'll start storing honey above, and gradually transitioning out the honey frames below. This way way the queen will fill out more and more of the bottom box's frames with brood, while the bees move their honey storage to the above box. The excluder will keep, or exclude, the queen from the top box. That way she'll fill out the bottom box and I can pull a couple frames of honey from the top box once it's finished. I can't wait to taste it!

   I didn't check the hive over in depth. I saw a few eggs and lots of healthy comb from just pulling the frames up by only a few inches. The queen is still doing her thing and the colony is very happy. No stress buzzing from these bees. They were also so busy that only two guard bees came by to inspect me.

   All in all, I couldn't be happier with these Italian-Carniolans and would definitely recommend any beginner to purchase their nucs from Steve over at Bee Healthy Honey Farms. He's a great guy, cares about his bees, and these girls are definitely proof of his hard work!

The Wildlings


   There really isn't anything to cover about the Wildlings this week. I'm leaving them alone until Thursday. They had queen cells last week and they should have hatched out by now. I don't want to risk accidental damage to the new queen, and I don't want her to get spooked. Everyone I've spoken to has recommended leaving the hive untouched for at least two weeks as well.

   There was some crazy vine growth leading up to their entrance, so I cleared that and took their empty feeder jar to refill at home. Sugar syrup is being chugged like mad, so they're definitely keeping busy! I'm not all that concerned about them to be honest. They're a good starting size and, if need be, I can pull a frame from Winterfell for them to build new queen cells. 

   Most would just say "Hey Charles, why don't you just buy replacement queens?". That would be the easy thing to do, but my main goal is to breed hardy, hygienic bees. Feral bees are healthy, proven bees that are able to thrive so well that they reproduce. Remember that honey bees reproduce on a hive level. Any wild swarm is, usually, led by a successful queen that has survived varroa mites and other pests without any "help" from humans. Those are the bees we want as beekeepers. On a large commercial scale, honey is a secondary product of successful bees, while pollination is the primary "product". If the Wildlings and Dothraki can be guided to full health that will be two more hives that can each be split twice in the next twelve months, creating a total of eight hives from just those two!


   That sums it up for this week's hive inspections. Pretty busy, huh? All of this with full time summer classes and working part time, as well as making sure my Kai Ken puppy (Ren) gets all of the attention she deserves. It's a lot of work, but very rewarding. Especially beekeeping, it's part therapy, part physical workout, and part meditation. It's very mind-cleansing to work in agriculture. It gets you back in touch with a part of life that a lot of people are missing out on, and that's the connection with our roots as Earth dwelling mammals. The woods and nature are part of us, and many studies are showing that without we get very stressed out. 

   If anyone reading this thinks that they might like beekeeping, then you should definitely give it a try. It's as involved as you want it to be. Set up a self-made "top bar hive", get some bees, and let them do their thing. Check on them every two or three weeks to make sure there aren't pest problems, and let the bees do their bee thing. They'll make you happy, make your garden a lot more productive, and you'll be doing a good thing for wild bees as well.

   See you next post!


Thursday, May 16, 2013

First Solo Cut-Out: Third Feral Hive Recovered... And It's A BIG One!


This has been one intense week. Monday was my first day of summer classes, spanning from 10am to 9pm. Three classes, each several hours long, with one break of 1 1/2 hours, and then a break of 2 1/2 hours. Rough. I need to start packing a fruit salad and yogurt as an energy snack. As if that wasn't enough, I got an email in the morning about a cut-out that was needed that afternoon. Any reasonable person would have been tired, and would have asked to see if it could be done the next day. But I was too excited to be reasonable. This would be my first cut-out to be done by myself!

I headed straight from Biology lab to the property by Palm Beach Gardens. Upon ringing the doorbell I was introduced to a really nice woman who, as it turns out, used to keep bees while living in France. She was very happy to have the bees rehomed to a "backyard" situation, where they would be looked after, instead of the large tree pot that was their current home.

As we walked out to the backyard, she described how the bees had originally arrived. They had shown up approximately 4 to 6 weeks before, and then decided that the pot would make a great home. It was large and roomy, had a nice dark interior, and small drainage holes around the top for small, easily guarded, entrances. "No big deal," I thought, "I'll just pick it up and move it into the open. Then cut out the few panels of comb to place into a nuc box, then be on my way...".


NOOOOOPE. I would most definitely NOT be right along on my way. These panels of comb were MASSIVE. I don't mean "Huh, that's some big comb.", I mean "WOAH... this is going to take a few hours...". An important lesson was learned this day: Don't ever underestimate the honeybees. I should have brought a complete set of ten empty frames. Unfortunately I only had five, and the location was a full hour away, in zero traffic, from my house. I also had work the next day, and then another full day of class. So there was no way to come back the following day, or even the day after that. I was going to have to make do with what I had.

The top of the tree pot was a good 3ft wide and just as deep. There were nine panels of comb, with the largest ones spanning from the top of the pot to the bottom. It wasn't just comb that had to be dealt with either, there were a serious number of bees in this hive!

Now, I haven't seen a huge amount of hives up close. But this comb was by far the most beautiful, perfectly filled comb I have ever seen. If you look closely at the picture above, you can see the left side panel quite clearly. There is a half circle of capped brood, at the center, that is in the process of hatching. After this there is a very clean arc of eggs (looks like empty cells), followed by another perfectly laid arc of young capped brood, and then after that is shiny fresh wax filled with eggs (which you can see more clearly on the edge of the right panel of comb). This comb was stunning. I wanted to save as much of is as I could. If only they made curved frames!

After wondering just how the heck I was going to do this for a good five minutes, I got started. The comb was so long and new that they all drifted to the sides after flipping the pot over. However, at least none of them detached or broke off. Mike taught me that the proper way to go about this is to figure out which way the comb is facing, then flip the container over with the combs running away from you. So when flipping, you should be able to look straight down the spaces between combs. This follows the structural strength of the comb to avoid breakage. If you flipped a container with the comb running lengthwise, with the end of each panel at one of your hands, then there's a good chance of panels completely falling off and onto the ground.

It was extremely messy work and I wish I had taken more pictures, but, since I was doing it all solo, there was no way without being significantly slowed. Thankfully the bees had replaced hatched brood with honey and pollen along the tops of the panels. That way I wouldn't have to be so concerned about salvaging under-developed comb that only housed minor amounts of honey or brood.

That being said, I still had to cut into that perfect comb. It was mentally hard to do, putting hive tool to immaculate brood comb. Each panel got cut up into two smaller panels that would each be rubber banded into an empty wooden frame. Seeing the developing, bee-shaped pupae falling out and being crushed was really tough... but there was no way around it. Not just that but I had to be extremely careful with the whole thing. Careful to damage the brood comb as little as possible, careful to not crunch any adult bees on accident, careful not to be too rough and damage the queen without realizing. It was a lot of self-reassurance without having Mike there to ask questions to.

Eventually, I got all of the comb either transferred into frames, and what couldn't be framed got bagged up for wax reclamation. As I was pulling out the last three panels, I got a glimpse of the queen. She was quick though and disappeared into the mass of bees before the queen clip was ready. I was ready to start sweating about finding one queen bee among 10,000 bees. All of which were randomly walking around the pot and supporting wheelbarrow. However, just as I got the last panel out and returned with the queen clip... there she was! She had somehow made her way up from the bottom of the pot to the inner lip, and flashed over top of the other bees for just a second. That second was all I needed and I was able to clip her on the first attempt. Not to pat myself on the back, but picking out the queen is starting to become an unconscious reflex. All of this cut-out experience and hive checking is building some great experience!


Once she was clipped it was just a matter of placing her in the nuc box, setting the nuc box about 10 feet from the wheelbarrow and pot, and waiting. I dumped what bees I could from the pot onto the top of the nuc box, then put it back on the wheelbarrow. Then it was time for a dinner break.

I hit a great local Cuban restaurant, and then returned about two hours later after dark. All of the bees were off the wheelbarrow and in the nuc box with the queen. Perfect! There was still a giant beard on the front of the box though, due to the sheer size of the hive. I ended up just scooping them off the sides with my hands and putting them on top of the box. It was dark so they just stayed clustered up there, then it was off to the car for these bees.

After arriving at home, I went to the trunk to get the bees out and... crap, there were bees bearding from the entrance of the nuc and onto the walls of the trunk! I tried to get as many as I could out, but knew they'd have to be handled tomorrow. At night they seem to just go into stasis and ignore most of what's happening. The trunk would smell too much like the queen and they wouldn't follow her immediately to the backyard. So the nuc was taken to the back yard, set up into a full sized Deep hive body, and I went to bed.


And this is what I woke up to! I tried to manually get the bees out for about fifteen minutes, but there were just too many inside the trunk and inside the cab of the car. What ended up working was bringing the empty nuc back and placing it next to the car. It smelled like the hive and queen, so they quickly moved over into the box. The ones inside got heavily smoked and almost all flew outside on their own. They caught the scent of the nuc and went in, leaving only a few stragglers inside who got shooed out by hand. Success, hive #4 has been successfully relocated to the backyard for rehab!


I didn't have a spare telescoping cover (forgot to pick an extra up in Miami), so I cut a piece of pine board into a nice size for the hive. The triangle of wood is just heavy cedar to weigh down the cover. Right after they were checked on, I had to go to work. So I did that and then came home to see how the girls were doing. They were gentle the whole time and will let me sit next to them without issue. The first day was all orientation flights and sending out forager scouts. It was a constant cloud of 25-30 bees in the airspace around the hive, many of them departing and arriving from the surrounding area. The area around my home must be great, considering many of them were already returning with very full pollen baskets.


I also noticed that the Dothraki hive had extra guards at the entrance, and that there was a lot of traffic coming and going from their entrance. There's no way to visually be sure which hive the bees belonged to, so rather than risk the Dothraki getting robbed, I reduced their entrance to an opening of about an inch and a half. Afterwards they seemed to feel more secure and posted less guards. One interesting thing to note, however, is that at night they pack the entrance with "sleeping" guards so anyone entering would have to touch them. The new hive also has bees at their entrance at night. Both of these are new behaviors that I haven't seen before, so my hypothesis is that they post extra guards at the entrance when there is another nearby hive (possible competition).


I was also able to record some high definition video of the new hive's activity of their first full day. There's a lot of traffic coming and going for orientation and harvesting. There is also some fanning going on, although I'm not 100% positive whether it's ventilation fanning or pheromone fanning. It'd be great if someone could confirm which it is. I want to say it's pheromone fanning since there were only three bees total who were engaged in fanning. However, none of them had their abdomens pointed upwards to expose their pheromone glands. Three bees just doesn't seem like it's going to accomplish much in terms of air conditioning, so I'm a bit stumped on which it could be.


I highly recommend watching in 720p/1080p in full screen!

All in all the bees seem very happy. I released the queen at around 11pm on the day following the cut-out. After class yesterday, I checked back and the bees are still there. So they're happy, the queens happy, and they all approve of the new home. I'm thinking of moving them to the bee yard later today or tomorrow.

The only thing that worries me is not having a proper cover for them. I'm not worried about beetles that much. They were living directly over the dirt and had only two beetles that I could find, both of which are now dead. These are awesome bees, super busy, very friendly and patient, and I'm completely confident that they will be my strongest hive. If this queen keeps her immaculate laying pattern then this hive is going to be booming over the next month. They'll definitely need a second Deep box in two weeks, then another month or two to fill that up. Once that's done, it'll be time to add a honey super for my first ever frames of honey! After pulling a bit of honey, I will definitely be splitting this hive to start a new colony. Exciting stuff!


P.S. Regular readers may have noticed that some ad banners have popped up on the sides. I'm not a fan of ads, but the Google AdSense ads actually promote reputable beekeeping suppliers (ex. Mann Lake, Dadant) as well as some companies selling package bees. There is an ad that pops up every now and then for RoundUp (Monsanto), and I am working out how to specifically block that ad. AdSense allows blocking specific advertisers and, as soon as I know how, that ad won't be showing up here.

A click every now and then would be a nice help towards offsetting equipment costs for rehoming all of these bees. I'm just a backyard keeper for right now, learning everything I can about honeybees (majoring in Entomology, hoping to specialize in honeybees and social insects), and rehoming what bees I can as a free service in exchange for hands-on experience. My promise to you guys is that I will never put pop-up ads or obnoxiously place banners anywhere. Thanks for reading!

Friday, May 10, 2013

Beekeeping 101: The Bees, Terms & Tools


So I've been receiving a good number of questions from friends and family who have been checking out the blog. Most of which are over beekeeping specific terms, things like "nuc", "nuc box", and "superseding".

Ann suggested a reference post that contained the hive names and origins of each. After some thought I figured that it would make a full post if I instead wrote a short primer that also included the specific information about my bees. This is by no means an overall index of terms and equipment. This post will instead cover all of the equipment and bees that I own or have written about. A part two will, of course, come later on once I acquire more beekeeping equipment!

The Bees (in order of acquisition)

Domesticated Bees:
 Winterfell Hive: Italian-Carniolan bees, purchased as a nuc from Bee Healthy Honey Farms

Feral Bees:
 Dothraki Hive: Collected from a swarm in Deerfield Beach, FL at 2000 EST on April 25, 2013
 Wildling Hive: Collected from a water meter cut-out in Boynton Beach, FL at 0800 EST on May 1, 2013


Equipment


Personal Equipment


Smoker (blue and yellow thing in the picture) - This one is does exactly as it sounds. It's what the beekeeper uses for pushing smoke into the beehive. It's extremely simple, a bellows is on the back side (same concept as an accordion) and it blows air into a hollow metal cylinder, the cylinder holds wood chips or any other clean burning material.


Veil - This too sounds like what it is. You know how a bride wears a veil which covers her entire head area? I wear one too, except I'm just not as pretty. This too is a fine mesh that surrounds the beekeeper's head area. They come in many styles. Some are a wide brimmed hard or soft hat with a netting hung over it, some are a wide brimmed hard hat with a square frame hanging down in front of the face which keeps the netting taut, some are attached to a jacket and some are not.

Jacket - This is a jacket made of thick material which covers the entire torso of the wearer AND also includes a veil built right into it. So it is a veil/jacket combination. The smallest detail on these jackets, but also incredibly important, are the thumb loops. There's a loop at the end of each sleeve for the beekeeper to slip his thumb through. This makes sure the sleeves stay up around the wrist and don't slip out from the gloves.
These too come in many styles: different combinations of pockets, different styles of attached veil, detachable veil or non-detachable, and thankfully, hot weather jackets! These are a thick mesh material on the outside supported by a more solid material framework underneath that holds the outer material away from the skin. All while letting the breeze through. I can't wait to upgrade to one of these, the intense mid-day Florida heat will dehydrate a beekeeper in minutes!

Hive Tool - To simplify it, this is a flatter, thinner, and wider crowbar. The purpose of this tool is to allow a beekeeper to scrape propolis and wax from undesirable areas of the hive box, separate frames and hive bodies when thickly glued together with propolis, and while it may not be advertised for this... scraping out stingers when your newbee hands get the shakes... resulting in nervous bees... like today. Ow.


Gloves - These are just like they sound. Medium thickness gloves made of supple leather, with a forearm extension of soft canvas. These slip on over top of the jacket sleeves, providing a bee-tight seal over the jacket fabric. This way there are no sneaky bee stings slipping between a jacket/glove gap.


Queen Clip and Queen Cage - Clips look almost exactly clips for women's hair. The difference being that it forms a cage on the side opposite from the thumb grips. This is used for isolating the queen from a swarm or hive. A Queen Cage on the other hand is a little plastic or wooden containment container that a bred queen is held in, with one end being a candy plug. These will be inserted into a hive and she will (ideally) be accepted by the workers once they eat through the candy plug.

Bee Brush - This is a long bristled brush that is extremely soft. This is used for brushing masses of bees off of things they shouldn't be on. For example, today I transferred a hive from a Deep to a Super and some of them hung around on the original box. They were gently brushed off of the original box and into the open top of the new box without being damaged.

Hive Equipment

Deep - This is the box that composes the main hive body. The main purpose of a deep is to house larger frames that gives the queen a ton of laying space. This way a large number of eggs and bees can be raised while the workers are able to build a thick ring of bee bread and honey to support the younglings. Many beekeepers in the South use a single Deep and then just stack supers on top since there's no real need to winter. I'll be using two Deeps for larger, stronger numbers and leeway in case of any problems.


Super (pictured is a "Super" nuc box) - This is box that is 2/3 as tall Deep. These are stacked on top of Deeps and almost exclusively used for honey. Some people have started using Supers instead of Deeps due to weight, and for good reason. A Deep that is fully loaded with only frames of honey can weigh 90lbs / 41kg! A fully loaded Super will weigh about 60lbs / 27kg. I highly recommend going with Supers over Deeps unless you're in your 20s, doing your squats, and eating your oats.


Nuc - This is shorthand for "Nucleus Hive". This is a term for selling and purchasing bees. They are housed in a half size (5-frame) box and is a complete hive. It contains a mature, laying queen, 3-5 frames of drawn out comb, eggs, larvae, capped brood, and a full regiment of worker bees. Up until the moment of purchase, these bees have been doing everything that any other hive does. They become active in the morning, fly out to collect their pollen/nectar, raise and feed young, and guard the hive. These are industrious girls ready to go to work the moment they are relocated to your home/bee yard.

Nuc Box - This is simply the box that a nuc is housed in. These have a ton of different uses, so you should definitely hold onto it if you purchase a nuc! I use these boxes as swarm traps (put some swarm lure in, rig it up in a tree, and cross your fingers that scouts from swarms will like it and tell their sisters to move in), for rehoming bees from cut-outs, and for the future when I do a hive split. It offers less space for pests to hide compared to a full size hive, more security with less interior space to guard, and it's easier for small colonies to regulate the temperature with less air to move.

Package Bees - This is a package of... just bees! A package box is a wooden frame, with screening enclosing the entire thing, a feeder to keep them fed on their journey, and a queen in her own cage with a few baby bees to feed her. These contain between 10,000 and 12,000 bees. I like the idea of package bees, but, as a beginner, I would only recommend package bees in the event that there are no nucs available in your area. It's usually only an extra $25-35 for a nuc, and you'll get a fully working hive + the nuc box itself. The package bees are going to have to draw out completely new comb from bare foundation if you're just starting out, and that means the queen won't be laying eggs until that comb is built up.


Top Cover (aka Telescoping Cover) - This is the lid that goes over the top of the entire hive. It's not a flat lid, but it has edging that comes down over the side of the hive box. This creates a better seal against the elements. I have no idea why... but someone in the club bee yard is using those corrugated plastic, political campaign signs as their top covers with bricks on top. I feel bad for the bees considering this is Florida. There must be so much moisture (and rain) going in those hives, as well as being an open invitation to hive beetles. Don't be that person, especially in a bee yard that you're sharing with other people! There's absolutely no reason to not spend the $18-20 on a top cover.

Inner Cover - This is a flat piece of wood with raised edges and a hole in the center. This provides a nice solid inner roof for the hive. This way the bees don't feel like there is too much room up top. They'll build comb anywhere that they can fit it. I highly, highly recommend one of these. If you don't get one, then don't be surprised when you lift the top cover and find panels of comb coming down off the top cover and attaching to your frames!

Queen Excluder - This is a sheet of plastic or metal that has worker bee sized slots cut into it. This allows workers to fit through, but not queens. This is normally placed between the top Deep and the bottom Super. This way the queen cannot get into the super to lay brood among the honey.
A lot of veterans call them Honey Excluders, since it makes it a bit more difficult for the bees to get into the Supers. If given the choice, nature always takes the path of least resistance. Not just that, but when the Deeps are properly managed then it's supposed to be pretty rare to get brood in the supers. I won't be using queen excluders on the basis that any extra abrasion on a bee's wing will shorten it's lifespan. Bee's work themselves to death due to their wings wearing out and becoming ragged after a certain amount of use.

Frames - These are basically picture frames, except they're for wax combs and not photographs. These hold in and support the wax comb. This way the hive is accessible, easy to work with, and easy to inspect (required by law). Not all hive styles use frames, some use top bars, but the concept remains the same. A wood or plastic support that the comb is attached to in order to meet Dept. of Agriculture requirements and make things easy to work with.

Foundation - This is the plastic or wax sheet that fits into the middle of the frame. Foundation sheets will be imprinted with hexagonal pattern of comb cells. The impressions act as a guide for the bees to
start attaching wax to right away and to skip the wax needed to build supports. When reading entries and you see solid black at the bottom of the comb cells, that is black plastic foundation.


Entrance Feeder - This is a small hollow plate of plastic or wood that an inverted mason jar is screwed into. The lid of the jar is perforated with small holes and attaches to the top of the feeder to act as a "roof". This way the bees can crawl into the feeder from inside of the hive, drink from the small holes in the lid, and then retreat directly into the hive. It cannot be accessed from outside the hive and can be refilled without opening the hive body itself. I really like this feeder setup a lot since I don't even need to touch the hive to measure how much the bees have been consuming.


Entrance Reducer - This is a small bar of wood that is laid across the entrance to the hive in order to reduce the opening. The bar has two openings, one about an inch long for a small setting, and the large setting is about 5 inches long. When a hive is small and new, or low in numbers for any reason, it is best to rotate the reducer to the small hole. That way the hive can be guarded with only a few bees, preventing other hives from coming to rob their honey. Once a hive gets strong it can be rotated to the larger opening, since the bees have both the available guards and the need to accommodate more forager traffic.


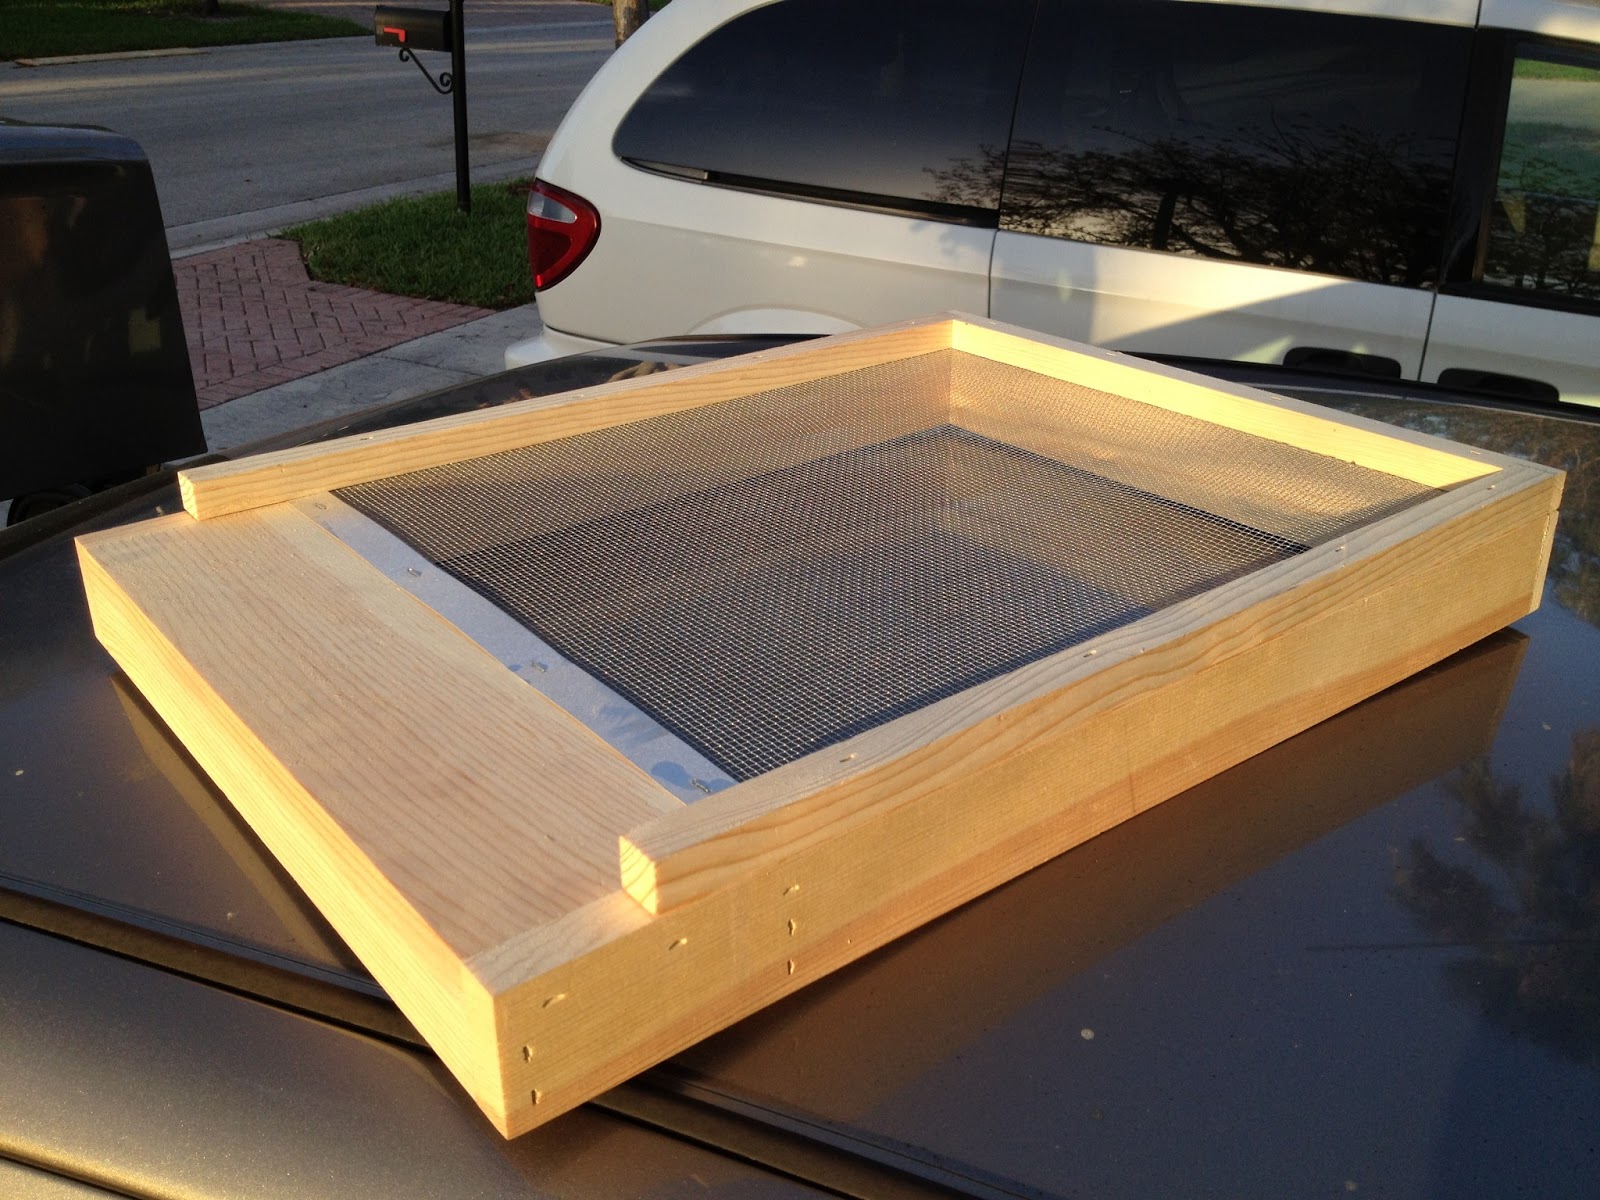
Bottom Board - This is simply the board that the Deep rests on. It has raised edging on three sides, allowed the fourth side, without a raised "wall", to act as a hive entrance. There are two options, screened or unscreened. Screened bottom boards have a metal mesh or "fabric" across the bottom that is too small for bees to get through, but large enough for them to push beetles and other debris out. Usually the screened boards have a nice space underneath that can fit either a plastic fast food tray filled with mineral to kill beetles/mites that land in it, or for custom made trays.

Landing Board - This is just an extension of the bottom board, usually in a downward sloping ramp. Honestly, I find these useless, or worse than useless. It's extra space for debris to accumulate, and feral bees have no problem landing on the side of a house to climb up into the roof. It's so much simpler for my bees to drop a dead bee, beetle, or piece of trash off the lip of the bottom board and onto the ground than it is to roll it all the way down a landing board.

Terms

Africanized - This is different than African bees. African bees (the breed) was introduced in Brazil, they have since spread into the southern half of the United States. Generally all bees south of the snow are a hybrid of European and African bees. Why are they not anywhere with snow? Because African bees produce massive amounts of brood and are not adapted to a snowy winter. The large amounts of bees will eat through their honey stores before winter is over and die. The gradient is between 10 and 99%, and these bees are Africanized bees, not "killer" African bees. Any wild animal/insect will defend it's young and bees are no different. They don't want to sting you since they will die and it weakens the hive, but if someone goes and knocks down their hive then they will react. The difference being the stronger the African genes, the more bees that will come to the defense.
Take all the news stories with a grain of salt. I was exceptionally rough with the feral bees today due to having to shift their "Super" frames out of the original box and into a "Super" box. No stings, no aggression. After all that knocking around, I lifted the lid on the Italian-Carniolans, pulled the first frame, and had a bee shoot straight out of the hive and zap me in the hand. I have yet to meet a mean feral hive, both in the "wild" and in apiary.

Queenright - A term used to describe a hive as having an established, laying queen.

Small Hive Beetle - These little jerks will sneak into a hive and eat the bee's honey. Afterwards they will lay their larvae in the honey and turn the comb into a wriggling, slimy mess. They won't destroy a hive by themselves, but they will definitely take advantage of a weakened hive. Bees also wont build on comb that has been slimed by the beetle larvae. Eliminate them with extreme prejudice.

Splitting - This is artificial swarming. Once a hive reaches a point where it is safe to remove 3 frames of bees, then a beekeeper can remove 2 frames of eggs+brood and 1 frame of honey. These frames will be set up in a nuc box and moved a few miles away from the original hive for at least a week. This allows the original queen's pheromones to fade and the bees in the nuc to realize "hey, we need a queen!". They will then raise a new queen, and she in turn will go on her maiden flight. Upon mating with drones, she will then return and begin laying eggs, thereby establishing a new hive. At this point it's safe to return the nuc to the original location without fear of the bees migrating back to the original hive.

Supersede - This is when the bees raise a queen cell with the original queen still remaining in the hive. This happens when the queen is damaged, becoming infertile, or simply is not laying consistently. The bees are raising queen cells in the center to top of the frames, and have decided they're going to throw a "surprise retirement" party for the current queen.

Swarming - This is when the original queen takes half the colony and leaves the hive. This happens when the hive is running out of space and there is simply not enough room to grow. Honeybee reproduction is on a hive scale, so the only time honeybees reproduce is when they swarm and establish a second hive. The remaining bees will raise a new queen, normally from the bottom of a frame, who will then take over queen duties for the original hive.

Varroa Mite - The bane of honeybees everywhere. These little mites hitched a ride from Asia and are now found across the entire United States. They are small mites that hop on the back of bees and bite into their abdomens, sucking on the bee's internal juices. They will then lay eggs in bee larvae cells, severely damaging the larvae as they develop. Mites alone aren't what is so devastating, it's the viruses that they carry.


That pretty much sums it up! Once I have more than three hives (which will be a bit more difficult to keep track of for readers) then I'll make a "bee roster" post and keep it updated as things change. I hope this helps :) As always, if anyone has any specific terms or questions they would like answered then please comment. I answer quickly, usually 6 hours or less, due to 5 hour work shifts. If I don't know the answer then I will research it, answer back, and link you references